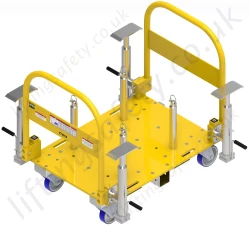
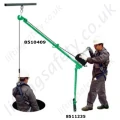
Sala Advanced Pole Hoist Davit. Lightweight Aluminium For Manriding using Independent Overhead Anchorage
Sala Advanced Pole Hoist Davit. Lightweight Aluminium For Manriding using Independent Overhead Anchorage
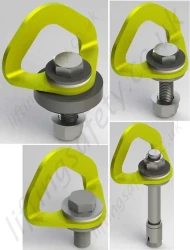
Connected via single anchor point, allowing you to work from direction from any angle. Complete with optional man-riding hoist.
Model:
Advanced Pole Hoist System
Quick Ref:
A-3508
More from:
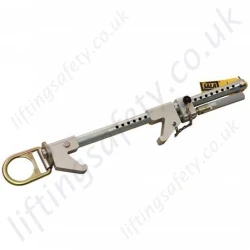
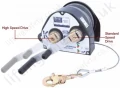
The Advanced Pole Hoist attaches with a carabiner on the universal bracket to a suitable anchor point, allowing you to work in any direction from any angle. The Advanced Pole Hoist has a unique swivel head that rotates 360 degrees, providing unparalleled flexibility in both vertical and horizontal confined-space entries. Overall length adjusts from either 4’ - 7’ (1.2 m - 2.13 m) or 6’ - 10’ (1.8 m - 3.05 m) for positioning attendant for working in close quarters. Custom Pole Hoist sizes are available.
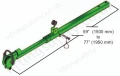
Advanced 4’ - 7’ (1.2m - 2.13m) Extendable Pole Hoist.
Model
Description
8510409
4’-7’ (1.2 m - 2.13 m) Extendable Pole Hoist, swivel head & hardware. Includes winch bracket.
8516303
4’-7’ (1.2 m - 2.13 m) Extendable Pole Hoist, swivel head & stainless steel hardware. Includes winch bracket.
Weight: 12 lbs (5.4 kg)
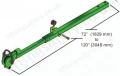
Advanced 6’ - 10’ (1.8 m - 3.05 m) Extendable Pole Hoist.
Model
Description
8510476
6’-10’ (1.8 m - 3.05 m) Extendable Pole Hoist, swivel head & hardware. Includes winch bracket.
8520869
6’-10’ (1.8 m - 3.05 m) Extendable Pole Hoist, swivel Head & stainless steel hardware. Includes winch bracket.
Weight 14 lbs (6.4 kg)
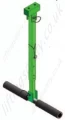
The lightweight Pole Hoist is an extremely versatile piece of confined space entry / retrieval and rescue equipment. Simply attch via carabiner and the universal attachment ring to a suitable anchor point to work in ant direction from any angle. Overall length adjusts 1.8m to 3m (6' - 10' ft). For positioning personnel or working in confined space. Designed for use with Sala (UCL) safety systems winches.
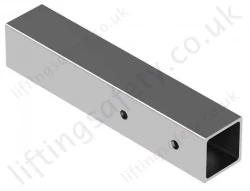
Powder coated welded aluminum construction with zinc plated steel hardware.
Mounting Requirements
Anchor points for the pole hoist must be capable of withstanding a minimum load of 907 kg (2000 lbs) 4.4 KN.
General Specifications
Specifications
kg
lbs
Rated Capacity (working load)
204kg
450lbs
Max. Allowed arresting force (M.A.F) rating for retractable devices ro shock absorbers
453.6kg (4.4kn)
1000lbs
Proof Load
907kg
2000lbs
Proof Test
UCT-133
Weight
Pole Hoist
6.3kg
14lbs
T-Bar Leg Assembly
3kg
7lbs
Dimensions
Material and Construction
General Construction
Welded Aluminum / Steel
Weld Certification
CWB-47.2, CWB-47.1
Base Material
6061-T6, 5052 Aluminum
Sleeve
6061-T6 Aluminum
Hardware
GR.5/GR.8 Steel, Zinc Plated
Finish
Gray Powder Coat
A) Setting up the Pole Hoist
Remove all parts from strorage / transport bags containers etc. and layout on ground.
Remove Pin (1) from T-bar leg assembly (2), rotate leg and replace pin. Remove Pin(3) from T-bar leg assembly rotate foot assembly and replace pin.
Remove Pin(4) to adjust T-bar leg assembly to a comfortable height for winch operation.
B) Winch and Cable Routing Installation
Install winch with upper slot in back plate (4) over hook on flat quick mount plate (5).
Swing winch in and down so that the mounting stud (6) engages the hole in the winch carrying handle (7).
Thread clamp knob (8) onto stud (6) and tighten securely by hand.
Pay out 5' to 10' of cable from winch, maintaining at least 10 lb. (5 kg) of tension on cable at all times.
Remove cable roller pin (9) & guide pulley (10) from pole hoist mast assembly (11). Place cable under guide pulley and replace guide pulley & cable roller pin.
Rotate pole hoist head assembly (12) so that slots through head align. Place cable through slot in head assembly and over pulley and around cable retainer spring (13).
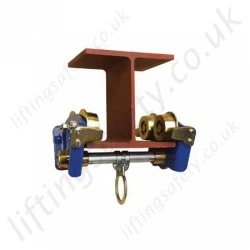
C) Pole Hoist Installation to Rated Anchor Point
Using hanger bracket(1) on top pulley assembly (2), hang pole hoist using certified anchorage point and certified hardware.
Make sure the T-bar leg(3) assembly is as vertical as possible to support the weight of winch while in use.
D) Installation of Winches, Self-Retracting Lifelines (SLR's), Work Positioning and Fall-Arrest Devices not Manufactured by Sala (UCL) Advanced Products
Your Pole-Hoist system can be used as a support structure for various types of safety devices. Any accessories being used for the hoist MUST BE installed, inspected, maintained and operated according to the manufactures instructions. All installations MUST BE approved to local standards by a qualified engineer.
E) Inspection of Equipment Prior to Use
Check all structural parts for damage: dents, cracked welds bend or crushed tubes. Minor cosmetic damage will not affect the structural integrity of the hoist, but any seriously damaged parts MUST BE repaired or replaced before using the hoist.
Check all hardware ( pins, tri-screws, adjuster screws, nuts, bolts, pulleys, rollers and winch brackets) for damaged threads, bend, damaged or missing fasteners, loose fasteners. Check all pulleys and rollers for chips, grooves and excessive wear. Ensure that all pulleys and rollers turn freely.
Inspect all equipment for missing, damaged or otherwise illegible warning stickers. Any damaged, missing or otherwise illegible stickers MUST BE replaced before using hoist.
If you are using UCL Safety Systems Winches with your hoist, inspect the winch and cable as outlined in the "maintenance and inspection" section of the Digital Series Winch operators manual.
Any additional winches, self-retracting lifelines (SRL's), work positioning or fall-arrest equipment being used with your UCL Safety Systems Hoist MUST BE installed, inspected, maintained and operated according to the manufactures instruction.
Report any problems with the equipment to your supervisor and DO NOT USE the equipment until it has been repaired or replaced.
If you wish to receive a quote for this product, please use the Pricing section to the right, this form is for general enquiries regarding this product only.
Regarding: Sala Advanced Pole Hoist Davit. Lightweight Aluminium For Manriding using Independent Overhead Anchorage
Did you know?
You can also request a quote through the pricing tab!
You can easily add more than one item to the Quote Request. This is highly recommended as we will be able to suit your needs much more efficiently.
Share this page!
Pricing
Availability
Usually 3-5 Days
The Advanced Pole Hoist attaches with a carabiner on the universal bracket to a suitable anchor point, allowing you to work in any direction from any angle. The Advanced Pole Hoist has a unique swivel head that rotates 360 degrees, providing unparalleled flexibility in both vertical and horizontal confined-space entries. Overall length adjusts from either 4’ - 7’ (1.2 m - 2.13 m) or 6’ - 10’ (1.8 m - 3.05 m) for positioning attendant for working in close quarters. Custom Pole Hoist sizes are available.
Advanced 4’ - 7’ (1.2m - 2.13m) Extendable Pole Hoist.
Model
Description
8510409
4’-7’ (1.2 m - 2.13 m) Extendable Pole Hoist, swivel head & hardware. Includes winch bracket.
8516303
4’-7’ (1.2 m - 2.13 m) Extendable Pole Hoist, swivel head & stainless steel hardware. Includes winch bracket.
Weight: 12 lbs (5.4 kg)
Advanced 6’ - 10’ (1.8 m - 3.05 m) Extendable Pole Hoist.
Model
Description
8510476
6’-10’ (1.8 m - 3.05 m) Extendable Pole Hoist, swivel head & hardware. Includes winch bracket.
8520869
6’-10’ (1.8 m - 3.05 m) Extendable Pole Hoist, swivel Head & stainless steel hardware. Includes winch bracket.
Weight 14 lbs (6.4 kg)
The lightweight Pole Hoist is an extremely versatile piece of confined space entry / retrieval and rescue equipment. Simply attch via carabiner and the universal attachment ring to a suitable anchor point to work in ant direction from any angle. Overall length adjusts 1.8m to 3m (6' - 10' ft). For positioning personnel or working in confined space. Designed for use with Sala (UCL) safety systems winches.
Powder coated welded aluminum construction with zinc plated steel hardware.
Mounting Requirements
Anchor points for the pole hoist must be capable of withstanding a minimum load of 907 kg (2000 lbs) 4.4 KN.
General Specifications
Specifications
kg
lbs
Rated Capacity (working load)
204kg
450lbs
Max. Allowed arresting force (M.A.F) rating for retractable devices ro shock absorbers
453.6kg (4.4kn)
1000lbs
Proof Load
907kg
2000lbs
Proof Test
UCT-133
Weight
Pole Hoist
6.3kg
14lbs
T-Bar Leg Assembly
3kg
7lbs
Dimensions
Material and Construction
General Construction
Welded Aluminum / Steel
Weld Certification
CWB-47.2, CWB-47.1
Base Material
6061-T6, 5052 Aluminum
Sleeve
6061-T6 Aluminum
Hardware
GR.5/GR.8 Steel, Zinc Plated
Finish
Gray Powder Coat
A) Setting up the Pole Hoist
Remove all parts from strorage / transport bags containers etc. and layout on ground.
Remove Pin (1) from T-bar leg assembly (2), rotate leg and replace pin. Remove Pin(3) from T-bar leg assembly rotate foot assembly and replace pin.
Remove Pin(4) to adjust T-bar leg assembly to a comfortable height for winch operation.
B) Winch and Cable Routing Installation
Install winch with upper slot in back plate (4) over hook on flat quick mount plate (5).
Swing winch in and down so that the mounting stud (6) engages the hole in the winch carrying handle (7).
Thread clamp knob (8) onto stud (6) and tighten securely by hand.
Pay out 5' to 10' of cable from winch, maintaining at least 10 lb. (5 kg) of tension on cable at all times.
Remove cable roller pin (9) & guide pulley (10) from pole hoist mast assembly (11). Place cable under guide pulley and replace guide pulley & cable roller pin.
Rotate pole hoist head assembly (12) so that slots through head align. Place cable through slot in head assembly and over pulley and around cable retainer spring (13).
C) Pole Hoist Installation to Rated Anchor Point
Using hanger bracket(1) on top pulley assembly (2), hang pole hoist using certified anchorage point and certified hardware.
Make sure the T-bar leg(3) assembly is as vertical as possible to support the weight of winch while in use.
D) Installation of Winches, Self-Retracting Lifelines (SLR's), Work Positioning and Fall-Arrest Devices not Manufactured by Sala (UCL) Advanced Products
Your Pole-Hoist system can be used as a support structure for various types of safety devices. Any accessories being used for the hoist MUST BE installed, inspected, maintained and operated according to the manufactures instructions. All installations MUST BE approved to local standards by a qualified engineer.
E) Inspection of Equipment Prior to Use
Check all structural parts for damage: dents, cracked welds bend or crushed tubes. Minor cosmetic damage will not affect the structural integrity of the hoist, but any seriously damaged parts MUST BE repaired or replaced before using the hoist.
Check all hardware ( pins, tri-screws, adjuster screws, nuts, bolts, pulleys, rollers and winch brackets) for damaged threads, bend, damaged or missing fasteners, loose fasteners. Check all pulleys and rollers for chips, grooves and excessive wear. Ensure that all pulleys and rollers turn freely.
Inspect all equipment for missing, damaged or otherwise illegible warning stickers. Any damaged, missing or otherwise illegible stickers MUST BE replaced before using hoist.
If you are using UCL Safety Systems Winches with your hoist, inspect the winch and cable as outlined in the "maintenance and inspection" section of the Digital Series Winch operators manual.
Any additional winches, self-retracting lifelines (SRL's), work positioning or fall-arrest equipment being used with your UCL Safety Systems Hoist MUST BE installed, inspected, maintained and operated according to the manufactures instruction.
Report any problems with the equipment to your supervisor and DO NOT USE the equipment until it has been repaired or replaced.


 The Advanced Pole Hoist attaches with a carabiner on the universal bracket to a suitable anchor point, allowing you to work in any direction from any angle. The Advanced Pole Hoist has a unique swivel head that rotates 360 degrees, providing unparalleled flexibility in both vertical and horizontal confined-space entries. Overall length adjusts from either 4’ - 7’ (1.2 m - 2.13 m) or 6’ - 10’ (1.8 m - 3.05 m) for positioning attendant for working in close quarters. Custom Pole Hoist sizes are available.
 Extendable Pole Hoist")
 Extendable Pole Hoist")