


LiftingSafety Removable Fall Arrest Swivel Eye Bolt
Removable Swivelling Eye Bolt Anchorage Point. Complies to EN795.
REB-2297
Unfortunately the SELSRAP has been discontinued. Please see our range for a possible alternative fall arrest anchor eye.
The SELSRAP is a temporary anchorage point for 2 simultaneous users comprising RAP-anchor sleeve and a detachable RAP-ring eye as the main components. It has been tested as per EN 795. The anchor sleeve is either fixed in concrete or bolted onto suitable structures and can be closed discreetly with a sealing cap when not in use.
Press the unlock key, insert the ring eye into the sleeve and it is ready-to-use.
Components

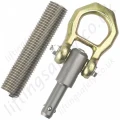
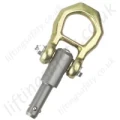
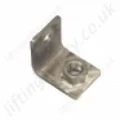
SELSRAP Swivel Eye Bolt
A new removable anchorage device which complies with EN 795, Class A.
Approved to be used by two persons simultaneously.
The anchor eyebolt can be removed and reinserted into the anchor socket.
It can only be released by the user pressing the unlocking button.
The eyebolt can swivel ensuring the user can be safely connected in any position.
Eyebolt is Stainless Steel shaft with zinc plated ring.

SELSRAP Basic Anchor
Supplied with white plastic socket cap.
Made from stainless steel.
The anchor socket should be fixed with chemical adhesive appropriate for the substrate.
Lengths: 100 mm, 125 mm, 200 mm or 250 mm
SELSRAP Basic Anchor
Supplied with white plastic socket cap.
Made from stainless steel.
The anchor socket should be fixed with chemical adhesive appropriate for the substrate.
Lengths: 100 mm, 125 mm, 200 mm or 250 mm

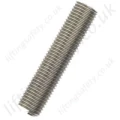
SELSRAP Angle Fixing Aid
The angle along with M16 threaded rods is required for fixing the RAP above suspended ceilings into soffits or to walls.

SELSRAP Plate Fixing Aid
The angle along with M16 threaded rods is required for fixing the RAP above suspended ceilings into soffits or to walls.
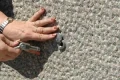
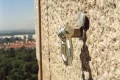
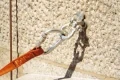
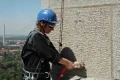
Examples Of Use


Safety Precautions
A 1. These instructions must be brought to the attention of any employee using the SELS-RAP anchorage device for personal protection before he begins to use the device. Action contravening these instructions put people’s lives at risk! Operatives must be given training covering these instructions and the user information before starting work and at regular intervals thereafter, but at least once a year.
A 2. The owner of the anchorage device must ensure that this instruction
- • either is kept easily available and well preserved at place of installation
- • or that the system owner keeps the instructions at a location well known and always easily available to a user of the system.
A 3. The operator must be able to present these instructions at the request of the manufacturer (Christian Dalloz Holding Deutschland GmbH & Co. KG or one of its authorised dealers).
A 4. When using further personal protective equipment, the corresponding guidelines must be observed.
A 5. Precautions for suitable rescue action must be taken before and during operations in areas presenting a risk of falls.
A 6. The anchorage device SELS-RAP can be used only according to regulations. It is not permitted to use the anchorage device as a mean of transportation or to secure loads.
A 7. The SELS-RAP anchorage device may not be exposed to chemical or other aggressive substances.
A 8. The site manager of the assembly firm must fill in the checklist (Section E) clearly and correctly using a permanent marker pen.
A 9. The system has been certified by EXAM BBG Prüf- und Zertifizier GmbH, Dinnendahlstrasse 9, 44809 Bochum.
The anchor socket must remain free of any dirt, dust, chemicals, painting and any other materials that could enter the socket and be detrimental to correct locking of the bolt into the socket. In case there is any doubt on the anchor socket's being clean, have it checked by an authorized person before any new usage. The authorized person will be able to verify it, clean it and check that the socket works correctly again.
Assembly and Installation

Important!
Before installation, you must make sure that the element to which the SELS-RAP is secured can withstand the stresses that can occur in the event of a fall (proof of stability). This must be documented in writing by a qualified engineer.
The cross-sections of the components as indicated in the product documentation are minimum values for introduction of the load and are not to be regarded as proof for the above purpose. Otherwise the generally recognised rules of the art apply.
The anchor socket must remain free of any dirt, dust, chemicals, painting and any other materials that could enter the socket and be detrimental to correct locking of the bolt into the socket. In case there is any doubt on the anchor socket's being clean, have it checked by an authorized person before any new usage. The authorized person will be able to verify it, clean it and check that the socket works correctly again.
Installation on concrete
Structure requirements (for anchor sockets M22 and installation accessories M16)
Armored or unarmored normal concrete, usable in the tension zone or in the compression zone.
- Minimum concrete quality: C20/25
- Maximum concrete quality: C50/60
- Minimum thickness of the component h/min = 170mm
- Minimum edge distance minc = 85mm
- Minimum axle distance mins = 85mm
- Effective anchorage depth hef ≥ 70mm
 Installation on concrete, direct
Fixing accessories required:
Injection mortar FISCHER FIS. or WÜRTH WIT-C 100 not included in delivery
Installation:
- To cast the anchor socket in the concrete it is mandatory to use the injection mortar FISCHER FIS V or WÜRTH WIT-C 100.
- The assembly instructions given by the company Fischer and Würth must be observed.
- The anchor socket must have an effective anchorage depth of 70mm at a minimum.
- The assembling projection of the anchor socket may not be higher than 30 mm.
Drilling core diameter: d° = 24mm
Installation in suspended ceilings
Fixing accessories required:
- Pos.5 Installing bar M16 for suspended ceilings including 2 nuts and 2 lock washers
- Pos.6 Mounting link
- Pos.7 Mounting bracket
Injection mortar FISCHER FIS V or WÜRTH WT-C 100 Not included in delivery
Dowel for concrete approved by building Inspection (for alternative 1) Not included in delivery
Screw retention LOCTITE 2701 Not included in delivery
Installation:
- To cast the anchor socket in the concrete it is mandatory to use the injection mortar FISCHER FIS V or WÜRTH WIT-C 100.
- The assembly instructions given by the company Fischer and Würth must be observed.
Nominal drilling diameter d° =18 mm

Alternative 1
- Before installing the suspended ceiling fix the installing bar in the concrete by means of the injection mortar FISCHER FIS V according to the casting instructions of the company Fischer.
- Adapt the length of the threaded bar M16 to the assembling height of the suspended ceiling.
- Fix and secure the mounting link (Pos. 6) by means of the nut M16. The screw connection must be secured with LOCTITE 2701.
- After installation of the suspended ceiling, screw and adjust the anchor socket in the nut M22 of the mounting link. The screw connection must be secured with LOCTITE 2701.

Alternative 2
- Fix the mounting bracket to the structure by means of a dowel for concrete approved by building.
- After installing the suspended ceiling, screw and adjust the anchor socket in the nut M22 of the mounting link. The screw connection must be secured with LOCTITE 2701.

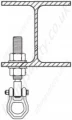
Installation on steel constructions
Structure requirements
- Minimum tin thickness: t = 5 mm
- Minimum edge distance minc = 30 mm
- Necessary assembling accessories
- Pos. 8 2 hexagonal nuts DIN 934-M22-A4-70 (not included in delivery)
- Pos. 9 2 washers DIN 125-22-A4 (not included in delivery)
Installation:
- Fix and adjust the anchor socket by means of the hexagonal nuts M22. The screw connection must be secured with LOCTITE 2701.
- The fixing projection of the anchor socket is = 30 mm.
- It must be made sure that the connection plates of the steel construction are sufficiently solid.
Drilling hole diameter: d = 23 mm
Application
1. The anchorage point SELS-RAP can be used only by two persons at a maximum.
2. If working in areas presenting a risk of falls, make sure that the operative is in a safe and stable position. Avoid anything in the access or working area that might cause stumbling.
3. Before each use it must be checked that the lock bolt locks safely in place. Before each use a visual control to check defects and functionality must be done.
4. Warning!
The anchorage device cannot be use in case:
- Visible defects refer to a previous fall
- The metal parts are visibly worn our or corroded
- There are cracks on the concrete surface
In those cases, the anchorage point must be checked by an expert and if necessary the parts must be replaced by an authorized installer.
5. The SELS-RAP can be used only combined with the following safety accessories:
- Full body harness according to EN 363 and shock absorber according to EN 355
- Guided type fall arrester on flexible anchor line according to DIN 353-2
- Retractable type fall arrester according to EN 360
- Rescue systems according to EN 1496, 1497 and 1498
6. Danger!
The personal protective equipment against falls from a height (only with shock absorber) or the rescue system has to be chosen so that it prevents the operative to impact against the soil or against other obstacles. The manufacturer’s users manual has to be observed.
The operative may never stay above the anchorage point at which he is securing against fall.
7. Installation of the lock bolt
- Remove the covering of the anchor socket
- Release the lock bolt pin by swiveling the shackle and pressing the lock-out button.
- Insert the lock bolt in the anchor socket until stop.
- Locking will be effected by releasing the lock-out button and pulling the lock bolt (hearable snapping of the locking).
- When removing the lock bolt, the anchor socket must be re-closed by the covering.
8. Attaching of the personal protective equipment
To secure against falls, the carabiner hook of the lanyard must be hooked in the shackle of the lock bolt and secured against accidental releasing.
9. Danger!
The operative must be otherwise secured against falls before
- The carabiner hook of the lanyard is detached from the anchoring eye of the lock bolt.
- The lock bolt is removed from the mounting ferrule.
Care and Maintenance
1. For safety reasons do never repair components. Damaged components (e.g. after a fall) shall always be replaced.
2. Only original spare parts or spare parts approved by the manufacturer may be used in repairs.
3. The SELS-RAP must be inspected for perfect condition by an expert as required according to the conditions of use and operational situation, but at least once a year (pursuant to BGR 198). The functionality of the locking mechanism has to be ensured.
4. Warning! An anchorage device that is deficient or has been subjected to stress from a fall must not be used any longer. It may only be used again if an expert has approved its further use.
5. A Competent person: Is a person who thanks to his eduction and experience in the field of personal protective equipment against falls from height has sufficient knowledge about applicable state and local safety regulations, applicable standards (e.g. EN-standards) and is thus capable and thus authorized by Söll of judging the correct status and use of systems and products against falls from height.
Contact Us About This Product
If you wish to receive a quote for this product, please use the tab, this form is for general enquiries regarding this product only.
You can also request a quote through the pricing tab!
You can easily add more than one item to the Quote Request. This is highly recommended as we will be able to suit your needs much more efficiently.
Share this page!

Unfortunately, this product has been discontinued and/or is no longer available. Please contact us for details on possible alternative products.
Unfortunately the SELSRAP has been discontinued. Please see our range for a possible alternative fall arrest anchor eye.
The SELSRAP is a temporary anchorage point for 2 simultaneous users comprising RAP-anchor sleeve and a detachable RAP-ring eye as the main components. It has been tested as per EN 795. The anchor sleeve is either fixed in concrete or bolted onto suitable structures and can be closed discreetly with a sealing cap when not in use.
Press the unlock key, insert the ring eye into the sleeve and it is ready-to-use.
Components
SELSRAP Swivel Eye Bolt
A new removable anchorage device which complies with EN 795, Class A.
Approved to be used by two persons simultaneously.
The anchor eyebolt can be removed and reinserted into the anchor socket.
It can only be released by the user pressing the unlocking button.
The eyebolt can swivel ensuring the user can be safely connected in any position.
Eyebolt is Stainless Steel shaft with zinc plated ring.
SELSRAP Basic Anchor
Supplied with white plastic socket cap.
Made from stainless steel.
The anchor socket should be fixed with chemical adhesive appropriate for the substrate.
Lengths: 100 mm, 125 mm, 200 mm or 250 mm
SELSRAP Basic Anchor
Supplied with white plastic socket cap.
Made from stainless steel.
The anchor socket should be fixed with chemical adhesive appropriate for the substrate.
Lengths: 100 mm, 125 mm, 200 mm or 250 mm
SELSRAP Angle Fixing Aid
The angle along with M16 threaded rods is required for fixing the RAP above suspended ceilings into soffits or to walls.
SELSRAP Plate Fixing Aid
The angle along with M16 threaded rods is required for fixing the RAP above suspended ceilings into soffits or to walls.
Examples Of Use
Safety Precautions
A 1. These instructions must be brought to the attention of any employee using the SELS-RAP anchorage device for personal protection before he begins to use the device. Action contravening these instructions put people’s lives at risk! Operatives must be given training covering these instructions and the user information before starting work and at regular intervals thereafter, but at least once a year.
A 2. The owner of the anchorage device must ensure that this instruction
- • either is kept easily available and well preserved at place of installation
- • or that the system owner keeps the instructions at a location well known and always easily available to a user of the system.
A 3. The operator must be able to present these instructions at the request of the manufacturer (Christian Dalloz Holding Deutschland GmbH & Co. KG or one of its authorised dealers).
A 4. When using further personal protective equipment, the corresponding guidelines must be observed.
A 5. Precautions for suitable rescue action must be taken before and during operations in areas presenting a risk of falls.
A 6. The anchorage device SELS-RAP can be used only according to regulations. It is not permitted to use the anchorage device as a mean of transportation or to secure loads.
A 7. The SELS-RAP anchorage device may not be exposed to chemical or other aggressive substances.
A 8. The site manager of the assembly firm must fill in the checklist (Section E) clearly and correctly using a permanent marker pen.
A 9. The system has been certified by EXAM BBG Prüf- und Zertifizier GmbH, Dinnendahlstrasse 9, 44809 Bochum.
The anchor socket must remain free of any dirt, dust, chemicals, painting and any other materials that could enter the socket and be detrimental to correct locking of the bolt into the socket. In case there is any doubt on the anchor socket's being clean, have it checked by an authorized person before any new usage. The authorized person will be able to verify it, clean it and check that the socket works correctly again.
Assembly and Installation
Important!
Before installation, you must make sure that the element to which the SELS-RAP is secured can withstand the stresses that can occur in the event of a fall (proof of stability). This must be documented in writing by a qualified engineer.
The cross-sections of the components as indicated in the product documentation are minimum values for introduction of the load and are not to be regarded as proof for the above purpose. Otherwise the generally recognised rules of the art apply.
The anchor socket must remain free of any dirt, dust, chemicals, painting and any other materials that could enter the socket and be detrimental to correct locking of the bolt into the socket. In case there is any doubt on the anchor socket's being clean, have it checked by an authorized person before any new usage. The authorized person will be able to verify it, clean it and check that the socket works correctly again.
Installation on concrete
Structure requirements (for anchor sockets M22 and installation accessories M16)
Armored or unarmored normal concrete, usable in the tension zone or in the compression zone.
- Minimum concrete quality: C20/25
- Maximum concrete quality: C50/60
- Minimum thickness of the component h/min = 170mm
- Minimum edge distance minc = 85mm
- Minimum axle distance mins = 85mm
- Effective anchorage depth hef ≥ 70mm
Installation on concrete, direct
Fixing accessories required:
Injection mortar FISCHER FIS. or WÜRTH WIT-C 100 not included in delivery
Installation:
- To cast the anchor socket in the concrete it is mandatory to use the injection mortar FISCHER FIS V or WÜRTH WIT-C 100.
- The assembly instructions given by the company Fischer and Würth must be observed.
- The anchor socket must have an effective anchorage depth of 70mm at a minimum.
- The assembling projection of the anchor socket may not be higher than 30 mm.
Drilling core diameter: d° = 24mm
Installation in suspended ceilings
Fixing accessories required:
- Pos.5 Installing bar M16 for suspended ceilings including 2 nuts and 2 lock washers
- Pos.6 Mounting link
- Pos.7 Mounting bracket
Injection mortar FISCHER FIS V or WÜRTH WT-C 100 Not included in delivery
Dowel for concrete approved by building Inspection (for alternative 1) Not included in delivery
Screw retention LOCTITE 2701 Not included in delivery
Installation:
- To cast the anchor socket in the concrete it is mandatory to use the injection mortar FISCHER FIS V or WÜRTH WIT-C 100.
- The assembly instructions given by the company Fischer and Würth must be observed.
Nominal drilling diameter d° =18 mm
Alternative 1
- Before installing the suspended ceiling fix the installing bar in the concrete by means of the injection mortar FISCHER FIS V according to the casting instructions of the company Fischer.
- Adapt the length of the threaded bar M16 to the assembling height of the suspended ceiling.
- Fix and secure the mounting link (Pos. 6) by means of the nut M16. The screw connection must be secured with LOCTITE 2701.
- After installation of the suspended ceiling, screw and adjust the anchor socket in the nut M22 of the mounting link. The screw connection must be secured with LOCTITE 2701.
Alternative 2
- Fix the mounting bracket to the structure by means of a dowel for concrete approved by building.
- After installing the suspended ceiling, screw and adjust the anchor socket in the nut M22 of the mounting link. The screw connection must be secured with LOCTITE 2701.
Installation on steel constructions
Structure requirements
- Minimum tin thickness: t = 5 mm
- Minimum edge distance minc = 30 mm
- Necessary assembling accessories
- Pos. 8 2 hexagonal nuts DIN 934-M22-A4-70 (not included in delivery)
- Pos. 9 2 washers DIN 125-22-A4 (not included in delivery)
Installation:
- Fix and adjust the anchor socket by means of the hexagonal nuts M22. The screw connection must be secured with LOCTITE 2701.
- The fixing projection of the anchor socket is = 30 mm.
- It must be made sure that the connection plates of the steel construction are sufficiently solid.
Drilling hole diameter: d = 23 mm
Application
1. The anchorage point SELS-RAP can be used only by two persons at a maximum.
2. If working in areas presenting a risk of falls, make sure that the operative is in a safe and stable position. Avoid anything in the access or working area that might cause stumbling.
3. Before each use it must be checked that the lock bolt locks safely in place. Before each use a visual control to check defects and functionality must be done.
4. Warning!
The anchorage device cannot be use in case:
- Visible defects refer to a previous fall
- The metal parts are visibly worn our or corroded
- There are cracks on the concrete surface
In those cases, the anchorage point must be checked by an expert and if necessary the parts must be replaced by an authorized installer.
5. The SELS-RAP can be used only combined with the following safety accessories:
- Full body harness according to EN 363 and shock absorber according to EN 355
- Guided type fall arrester on flexible anchor line according to DIN 353-2
- Retractable type fall arrester according to EN 360
- Rescue systems according to EN 1496, 1497 and 1498
6. Danger!
The personal protective equipment against falls from a height (only with shock absorber) or the rescue system has to be chosen so that it prevents the operative to impact against the soil or against other obstacles. The manufacturer’s users manual has to be observed.
The operative may never stay above the anchorage point at which he is securing against fall.
7. Installation of the lock bolt
- Remove the covering of the anchor socket
- Release the lock bolt pin by swiveling the shackle and pressing the lock-out button.
- Insert the lock bolt in the anchor socket until stop.
- Locking will be effected by releasing the lock-out button and pulling the lock bolt (hearable snapping of the locking).
- When removing the lock bolt, the anchor socket must be re-closed by the covering.
8. Attaching of the personal protective equipment
To secure against falls, the carabiner hook of the lanyard must be hooked in the shackle of the lock bolt and secured against accidental releasing.
9. Danger!
The operative must be otherwise secured against falls before
- The carabiner hook of the lanyard is detached from the anchoring eye of the lock bolt.
- The lock bolt is removed from the mounting ferrule.
Care and Maintenance
1. For safety reasons do never repair components. Damaged components (e.g. after a fall) shall always be replaced.
2. Only original spare parts or spare parts approved by the manufacturer may be used in repairs.
3. The SELS-RAP must be inspected for perfect condition by an expert as required according to the conditions of use and operational situation, but at least once a year (pursuant to BGR 198). The functionality of the locking mechanism has to be ensured.
4. Warning! An anchorage device that is deficient or has been subjected to stress from a fall must not be used any longer. It may only be used again if an expert has approved its further use.
5. A Competent person: Is a person who thanks to his eduction and experience in the field of personal protective equipment against falls from height has sufficient knowledge about applicable state and local safety regulations, applicable standards (e.g. EN-standards) and is thus capable and thus authorized by Söll of judging the correct status and use of systems and products against falls from height.
Contact Us About This Product
If you wish to receive a quote for this product, please use the tab, this form is for general enquiries regarding this product only.
You can also request a quote through the pricing tab!
You can easily add more than one item to the Quote Request. This is highly recommended as we will be able to suit your needs much more efficiently.
Share this page!